Sunday, November 10, 2019

Prescott Arizona Part I

Map of this blog's locations click this link to open the map

Our next stop after Sedona was to be Prescott Arizona. We had done a very short day trip to Prescott back in February of 2018 when we were camping in Congress Arizona. It had really appealed to us for a couple main reasons. There seemed to be lots of really good hiking options in the area and from the several geocaches we did, we realized this was a surprisingly good area for geocaching. There is an Elks Lodge in nearby Prescott Valley that is one of the few we have come across that actually takes reservations. We had called to get a spot for 10 nights figuring that would give us a good chance to explore. The long range forecast was still looking promising for early November even though the area is just over 5000 feet.

It isn’t a long drive from Sedona to Prescott, but the most direct route on State Route 89A would not be a good choice for larger rigs. It’s okay between Sedona and Cottonwood and we have even driven this with the motorhome. But the rest of the drive is up and over the mountains and the town of Jerome. It’s worth a visit but has lots of hairpin curves with steep conditions. Even going the “long way” is only 60 miles. The camping area next to the lodge has about a dozen full hookup sites although it’s only 30 amp electric. The sites aren’t super spacious but not uncomfortably close and on the plus side, they have very decent WiFi available at the camp sites. At only $25 per night, it looks to be a good spot for our base for our ten nights.

Just over the hill from the lodge is Fain Park. While you cannot walk the quarter mile down the hill to the park, it’s only a 2/3 mile walk, drive, or bike ride along the roads. I did discover the 10% grade over the last quarter mile to the parking lot was much more fun by bike on the way down than on the way up! The main draw of the park appears to be the 3 acre lake created by a small dam. We make it to this park several times during our stay and there always are several people fishing. I don’t recall seeing any of them catching a fish so maybe they are just there for the scenery and peacefulness of the area. There are several miles of trails in the park and a handful of geocaches as well. It is definitely a pretty setting with the fall colors and a glassy lake on still days.


Fall Reflections at Fain Lake


If you are a geocacher, this area should be put on your list of places to visit if you’re anywhere nearby. There seems to be lots of good geocache hiders in the area but there is one that goes by the handle of “The Raven” who has put out some incredible caches. One of the top five caches we have found (and we’ve found well over 13,000) was one we did on our first trip. It’s called the Raven’s Labyrinth (read about that cache in this post). So we knew we had to try some more of this cacher’s hides. He has two caches based on Indiana Jones that sounded really good. You must find the first one in order to get info for the second one so we figured we should go for them early in our stay in case they required multiple attempts.

The first cache brought us to the very unique looking Prescott Valley library. We have visited many libraries in our years of traveling and have done a handful of geocaches that are either hidden in or at least require a visit to a library in order to find the cache. This one was the most elaborate. We spent a good 90 minutes exploring the library looking for several medallions hiding inside. We were only given cryptic clues of where to look so we found ourselves crisscrossing the library multiple times trying to find the silver dollar sized clues. Obviously the Raven had worked closely with library staff in order to get all the clues hidden and to allow a final container to be hidden as well. Once we found the medallions, we had the required info to open the large cryptex and sign the logbook. But that wasn’t all we needed to accomplish because there was still information that needed to be found hiding in the cache container in order to be able to go for the second Indiana Jones cache. It took us a while and required us to use a black light to even read the clues. Fortunately, one of the small meeting rooms was available so we were able to perform all this work without other patrons staring at us. Afterwards we headed out to a small park like area next to the library to check out some of the metal artwork.


We would have attempted the second part of geocache series the next day but the weather was pretty miserable and we knew the next one would require a bit of a hike. We have had our fair share of rain and wind and even a dusting of snow since going full time. But apparently we hadn’t experienced hail while being cooped up in the rig. Fortunately the it wasn’t really large hail which might damage the rig or the Jeep, but it was bigger than a chick pea. The sound of the hail on the roof was unlike anything we have heard before. Deafening would be a good description.


Hail on Wipers
By late afternoon, the front had moved thru and the skies cleared a bit and we headed out for another Raven cache. This one brought us to a pedestrian tunnel underneath an expressway. The goal here was to find clues inside the tunnel which would allow us to unlock a cryptex hidden just outside of the tunnel. It is nearly 500 feet long and we were needing to find numbers that were written on the sides of the tunnel. Of course the numbers aren’t visible to the human eye without the use of a black light. I lost track of how many times we walked back and forth thru the tunnel but we could only come up with 9 of the 10 required numbers. I suspect our puny black light was too dim to overcome the now bright sun on the southern end of the tunnel. But we had enough information to open the container and sign the log. Having made a couple containers like this, I was impressed with the craftsmanship of his design.

Cryptex at End of Tunnel
The following morning was a much nicer start to the day so we headed out to tackle the second part of the Indiana Jones cache. We had a good idea of what to expect. We knew it was going to be in an abandoned mine shaft, and we would need a both a normal flashlight and our now trusty black light. We drove the Jeep as far as we dared and set off to hike up the steep trail to the entrance to the cave just over half a mile away. We had no real difficulty finding the entrance and there aren’t any warning signs or obstacles one must go past to enter cave - as long as you don’t listen to the voice in your head questioning your sanity for doing so. Fortunately the four hundred feet of cave had adequate headroom and was wide enough to not bring out any claustrophobic fears. The goal here was similar to the tunnel yesterday. Find symbols hidden along the length of the cave with the black light in order to open another cryptex container hidden deep in the cave.

Cave Entrance

Continue Deeper into Cave
We found several symbols along the way but it was much more of a challenge since the sides of the cave were not smooth like the tunnel. Some symbols could only be seen when facing into the cave while other required facing out. Plus the cave floor was rocky and littered with debris making walking without tripping tough. The normal flashlight was required to move, but then only the black light could be on to search for the symbols. It was tedious but after a few hundred feet we had found 6 symbols and also discovered the cryptex secretly hidden inside a railroad tie.

Indiana Jones Cryptex
Alas, we needed more symbols since there were 10 dials on the container. We proceeded to the very end of the cave another 50 feet past the container and found another 2 symbols. As we turned around to attempt to find the last two symbols, we could see the faint light from the opening in the distance. There were strange shadows that we couldn’t identify. I knew it wasn’t a person or animal walking in because it looked more like something flying. It didn’t take long to realize there were 3 or 4 bats inside the cave with us. As we worked our way out, we found it nearly impossible to look for the remaining symbols while worrying about the nearby bats. Towards the end of the cave, we nearly ran out to escape the bats and our fears. After the fact, the cache owner sent me a photo they had taken of a bat up close and personal. So glad we didn’t have that clear of an image while we were still in the cave!

End of Cave

Attack Bat!!!
We sat outside the cave opening in the bright sunshine and evaluated our options. We really wanted to open that cache, but even more so, we didn’t want to be bitten by bats in the process. So far we had spent the better part of the morning with little to show for it. We concluded that we should go back to the car for lunch and also find a few of the other caches further out the trail. Our logic was that if we killed an hour or two, maybe the bats will have settled down a bit and we could sneak in, find the remaining symbols, open the cache and exit the cave without attack. Sounded like a plan to us. Just up the trail from the cave we’re a few dilapidated houses from the mining days in the area.

Needs Some TLC

Possibly Only Good for Bonfire?
After lunch, we retraced our steps to the cave opening. This time we were a bit more prepared. I was wearing my heavy fleece. Not for the cool cave but as an added level of protection from bats. Our plan was simple. Head to the very back of the cave quickly and then work our way out. We found it easier to see the bats with the backlighting of the cave opening as we worked our way out. This time were were much more deliberate with our investigation which took a lot longer but allowed us to spot what we had missed earlier. With all the needed symbols, we headed back to the container and successfully opened it and then headed out. It wasn’t until we were just about to exit that we spotted unhappy bats overhead but we had made it. I wonder if this is how Indiana Jones felt after one of his missions?

The following day we decided for a much more mundane activity - a hike, no bats, no cave - just a hike. Watson Lake is situated about 4 miles west of the lodge although the drive is more than double that distance. We head to Watson Lake Park to start and pay the $3 entrance fee. We later find other free parking options, but this one is rather convenient. The hiking trail around the lake is 5 miles and we decide to go in a clockwise direction. There isn’t much elevation change so there either way would work fine. The view of the lake from the park rivals the view you might have at more famous national parks. We were blown away by the rock formations and the color variations due to the low water level.


Watson Lake

Reflections
 The trail is pretty well parked with trail markers every so often especially at intersecting trails. Along the way, there are numerous white spray paint marks on the rock where signs would be impractical. It reminded us of the trails in Acadia National Park except there, the paint is light blue. I would vote for light blue over white since bird poop could be mistaken for a white trail spot. We did find the humor in the one intersection where the trail splits and the sign warns of your choices being “STEEP” or “STEEPER”.

Follow the White Dots

Your Choice: Steep or Steeper
When we get close to the northern end of the lake, we see the dam that produces this lake. The rock formations are just astounding and don’t look like they could be made naturally. It reminds us of places like Joshua Tree National Park and Chiricahua National Monument. As we make the turn over the top of the lake and start to head south, we run parallel to the Peavine Trail. It’s an old rail trail that can be reached from several spur trails but we are finding walking closer to the rocks to be much more interesting.


Dam at North End of Watson Lake


Who Stacked the Rocks?


We are eventually forced to follow the Peavine Trail since the Watson Loop Trail joins it along the southern end of the trail. The second half of the loop couldn’t be more different than the first half. Don’t get me wrong, it would be a pretty walk around the lake even if it all looked like the southern end. But what makes this hike one of our favorites in some time is the northern half. Heck, if we were inclined to come back for a repeat hike, I might just turn around at the halfway point and head back the way we came and treat it like an out and back trail rather than a loop. That’s how beautiful the first half was.

South End of Watson Lake
Early in our stay at the lodge, we had gone to one of the dinners there. We had met a local couple and got to talking to them about hikes in the area. They had suggested one that we likely would not have stumbled upon otherwise. They called it the big tree hike and gave us the general location of the trailhead. After checking out our hiking, mountain biking and geocaching apps, we discovered the Giant Alligator Juniper Trail was the more official name for the hike. It’s a just under a 5 mile hike out and back to this particular tree and there is even a geocache nearby. What makes this tree so special? Well it is believed to be the largest and oldest alligator juniper tree in the country if not the world. This type of tree is common in this part of Arizona and is so named because as the tree matures, it’s bark takes on the appearance of alligator skin. This particular tree is estimated to be many hundreds if not over a 1000 years old. It also has a circumference of 26 feet while a more typical tree would be less than 10 feet circumference.

The hike was pleasant although there are some very sandy spots making for more difficult walking. Along the way are some good views of distant mountains and even some outcropping of rocks that look like those we saw at Watson Lake. There are lots of other trails so we were glad we had the coordinates of the geocache to help us choose which way to turn at various intersections. As we got within a hundred feet of the tree, it was clear which one was the champion tree. It dwarfs the other trees in the vicinity.


Distant Mountains

Boulders

Giant Alligator Juniper
While this tree was unique on its own, in June of 2013 it became that much more special. On the 18th of that month, the Doce Fire started about 2.5 miles from this spot and within hours was threatening to destroy this large specimen. The twenty members of the Granite Mountain Hotshots out of Prescott were called in to attempt to save this tree from the approaching fire. With lots of hard work they succeeded in clearing the area around the tree and managed to save it as the fire came thru the immediate area. Unfortunately, the story doesn’t end there. Twelve days later, the same crew was dispatched to help with the Yarnell Hill Fire about 30 miles to the south. During that fire, 19 of the 20 members of the team perished in the fire when the winds shifted and trapped them. If you are in the Prescott area, the Granite Mountain Hotshots Memorial State Park is a must do. We did the hike during our earlier visit to the area and it remains to this day the most moving hike we have done. Here at the giant juniper, there are numerous tributes that have been left in remembrance of those lost. This was a pretty moving location as well and worth the effort to get here.

Plaque at Giant Tree

Some of the Remembrances Placed at Tree

Colorful Painted Stone


Colorful Signed Stones

On the Way Back
We were enjoying the area so much that we decided to see if we could extend our stay for an additional week. The campground host checked his schedule and found he could let us stay in the same spot. The rest of our time in Prescott will be in the next blog post.

Friday, November 1, 2019

Return to Sedona

Map of this blog's locations click this link to open the map

We had visited Sedona during our first year on the road back in April of 2017. We had spent 6 nights in a state park in nearby Cottonwood with a couple day trips into Sedona. And then we had moved to the Elks Lodge in Sedona proper for an additional 6 nights. We realized we hadn’t gotten in all we wanted to see and do back then, so we figured it was time to make a return trip. The forecast for the Sedona was looking fairly good, at least for early October at an elevation of about 4500 feet. At least we would be coming down from the 7000 feet of Flagstaff so our odds of warmer conditions should improve.

It can be a beautiful drive from Flagstaff to Sedona down State route 89A, but we knew from our previous stay in the area, this is NOT the route to take in the RV. There are some extreme hairpin curves that would not be fun in a rig our size. So instead, we head down the more mundane Interstate 17 and come back into Sedona along Highway 179 from the south. This route has what seems to be a record number of roundabouts along the way - eleven of them. They are large enough to drive a larger rig thru, but they definitely require much more concentration to get around without scrubbing a tire in the process. We got to the Elks Lodge and found there was only one spot open but that would work. We got parked and headed into the bar to register. The plan was to stay 10 nights this time. During the first half of our stay, all the camping sites were occupied and there were often one or two rigs parked off to the side just boondocking for a night or until somebody left so they could grab the spot.

Having been here once before, we had already done some of the more popular hikes but there was more to see. On our first full day, we walked into town from the lodge. That’s one of the nice features of this lodge, it is close enough (about 1.5 miles) to the center of downtown. We even discovered a trailhead and was able to take an actual trail for about half that distance instead of walking the sidewalk along the busy street.

Beautiful Sedona Red Rocks

Sedona is a very quirky town. In some ways, it reminds us of Ithaca back in western New York except that Sedona would be Ithaca on steroids. The area is known for its vortex sites and has all sorts of shops geared toward the metaphysical. Not being true believers in such things, we are able to pass by most of the shops and avoid buying crystals or having a psychic reading. Scattered around town are a bunch of painted and decorated statues of javelinas. Lots of towns have done similar things with various animals. Cincinnati has its pigs, Custer has its bison and we remember horses in some place but cannot recall where. But using javelinas was a first for us. They aren’t necessarily the best looking animals and the real ones we have come across in the wild can smell a lot like skunks. But the statues have an adult and youngster and are creatively painted making them seem adorable.

Clothed Javelinas

Pink Javelinas
There are plenty of wonderful views right from downtown and many of the rock formations have been named. Snoopy and Lucy are two of the more popular ones but we still needed help to identify them. As we continued our walk around town, we stopped by the Tlaquepaque Arts and Shopping Village. This is a fascinating little collection of shops, restaurants and even a chapel. We found lots of creative pieces of art but none would fit in our current home so we just looked. The water fountains in the courtyards were decorated with colorful pumpkins and gourds.

Views from Downtown Sedona

Fountain at Tlaquepaque

Larger Fountain
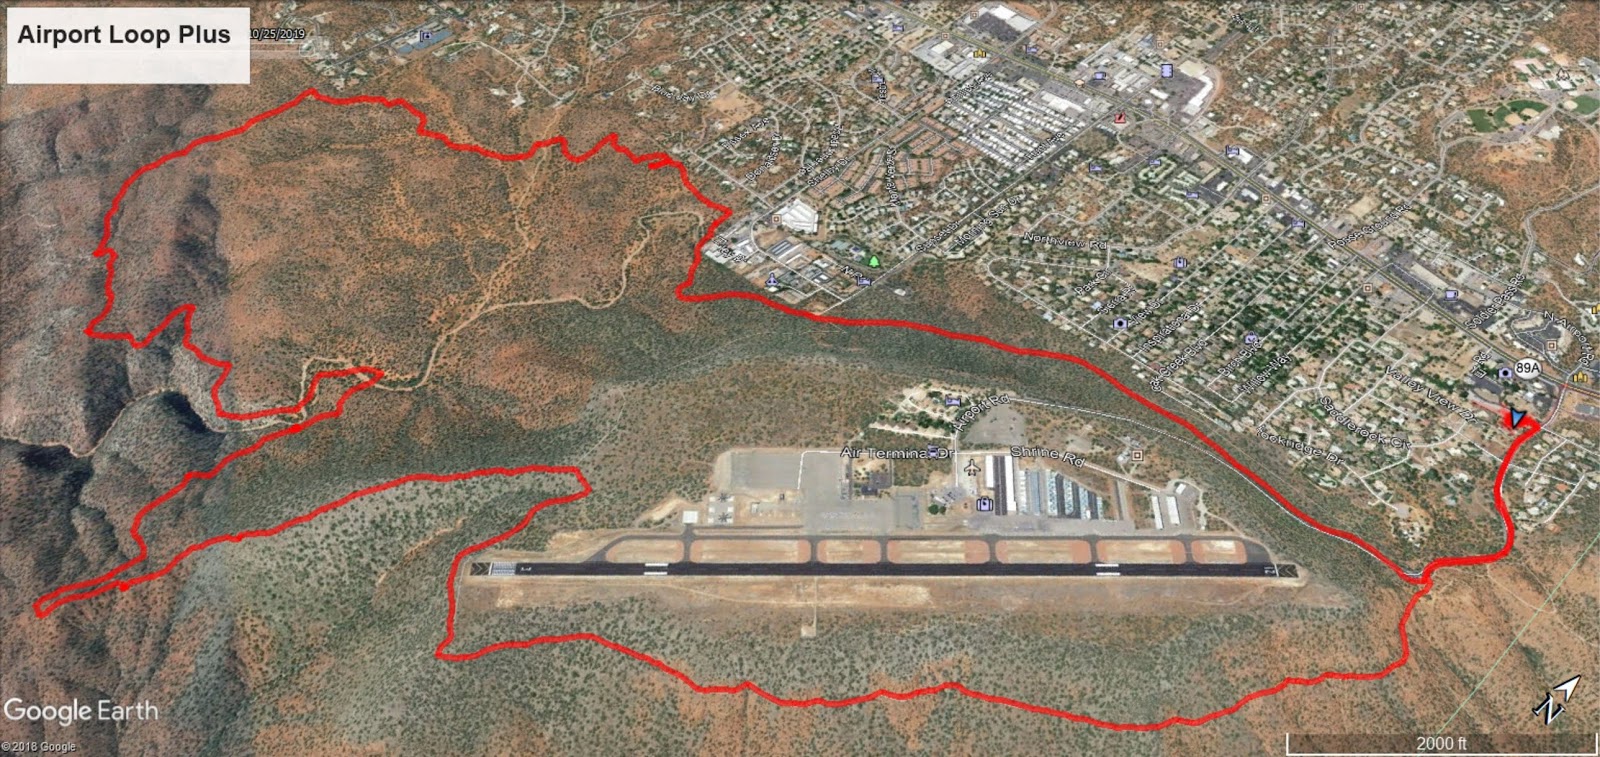
The next day we wanted to go for a hike. About a half mile from the lodge is a trailhead to the Airport Loop Trail. Since the parking area doesn’t hold many cars, we figured it made more sense to simply walk from the rig. We had done this trail before but this time we were going to add to it by taking some of the many trails on the west end of the loop. We followed the trail in a counterclockwise direction. It’s narrow, rocky and slightly downhill for the first mile. We were surprised to have several cyclists come up from behind. I know I wouldn’t have enjoyed the trail and Chris wouldn’t have even tried it. At the first split, instead of following the Airport Loop, we follow Bandit Trail and about half mile later get a couple more forks in the trail and continue on Old Post Trail.

View from Airport Loop
This route got us into new territory for us and gave us access to a few more geocaches along the way. There are some great views from this direction as well. Back in this section of trails, we run into very few people which is fine by us. We eventually work our way to the intersection with the Ridge Trail. From here we head south and expect to meet up with the steep Table Top Trail which will get us back to the Airport Loop. Apparently a short section of this trail has been closed even though there is a geocache part way up the climb. Our alternative is to backtrack over two miles, or follow the still obvious trail that heads up. We were already quite tired and figured we were better off taking the climb to the top. It wasn’t bad and made it to what is now the end of the Table Top Trail. Once we got back onto the Airport Loop, we started to run into lots of people again. As we got back to the trailhead area, there were dozens of people waiting for sunset in another hour. This is also the location of one of the vortex sites in Sedona so I suppose some people were here for that. We simply headed back down the hill to the rig with just over an 8 mile hike in the books.

Bell Rock in Distance

Color Variations


Airport Loop Tracks
The next day, we headed back to the new found trailhead just down Route 89A from the lodge. Like many hikes we take in areas with abundant trails, we start out the hike with one loop in mind but end up doing something different. The plan was a series of trails that would amount to a 4 mile loop from the Adobe Jack trailhead. We initially stayed to plan for the first 2 miles, but then we got distracted by a geocache called Devil's Kitchen Sinkhole. It was only about 1/2 mile out of our way so we went off script and found the right set of trails to get us there. It’s a very popular spot since there is a trailhead less than a quarter mile away. We check out the sinkhole and find the several geocaches in the immediate area. We were able to follow the Adobe Jack trail back to where we had started and our planned 4 mile loop turned into over 6 miles.

View from Trails Heading to Devil's Kitchen


We took the next day off to recuperate from two days of hiking. Plus, being a Sunday, we figured we could let the locals clog up the trails and we could come out on Monday to try the Boynton Canyon Trail again. We had done this hike when we were last here in the springtime. We figured it would be interesting to check it out in autumn. The parking lot at the trailhead was full but we did find a legal roadside parking 1/3 mile away. There were initially lots of people on the trail and at times it was slow going to get around groups out for a casual walk instead of a hike. Once the trail gets past the point of overlooking the housing development below, it became more scenic and a bit less crowded. We could hear somebody playing a flute in the distance, but were unable to see their location.

Neat Shadow from Trail Marker

View Along Boynton Canyon Trail

The trail heads up Boynton Canyon and has lots of trees along the way. The fall colors were pretty. With the narrow canyon and the low sun angle much of the later portion of the hike was in deep shade. When we finally made the last push up the steep section of trail to the end of the canyon, we were greeted with the gorgeous view of the canyon below. We found a spot in the sun to have our lunch. To our chagrin, we weren’t even halfway done with lunch when the sun started to drop behind the steep canyon wall to the south. The temperature dropped dramatically and we found the need to put back on our windbreakers for warmth. The return trip was uneventful but we did see lots of others heading up and they were not dressed warm enough for the cool fall day in the shade. It was a pleasant six mile hike.

Homes Along Trail


Looking Back Down Canyon from Lunch Spot

End of Boynton Canyon

Our Shade Maker


The following day will bring us back to the same general area of town. Doe Mountain Trail isn’t very long at 1.6 miles round trip but it does climb over 500 feet up the side of the mountain from the trailhead on Boynton Pass Road. With the trail being on the north side of the mountain, most of the climb is in the shade. It was a cool morning to begin with so we did not overheat on the way up. There are great views on the way up and it works out well to stop for a picture or two while catching our breath.

View Along Doe Mountain

Small Alcoves in Doe Mountain
Doe Mountain ended up to be more like a plateau with a fairly flat top and a perimeter of a mile or more. We walked along the edge of the plateau for a quarter mile or so to both take in the views and find a geocache hidden up top. Fortunately not many people wander much past the section near the end of the trail up so we didn’t have any muggles to contend with. As we were heading back to the trail down, we came upon a couple and started to chat. There are Canadians down in Sedona for awhile and even own a place in the area. We got some good insights from them as to what else there is to do in the area since they have been coming here for several years now.

Incredible Views from Doe Mountain


Pretty Flowers on Edge of Cliff
We did have a few cold days with temperatures dropping below freezing overnight. I suppose it being the end of October has a lot to do with that. After a couple days of taking it easy and my being a bit under the weather, we came out for one last hike before leaving Sedona. Devil’s Bridge is the largest natural sandstone arch in Sedona. There are several trails that can be taken to the arch. Most people will park near the intersection of Dry Creek and Boynton Pass roads and walk up the road. But our Canadian friends had suggested a more scenic and less crowded route. Starting at the same spot, we search out the Chuck Wagon Trail which starts out just to the northwest of the dirt road. The trail meanders around as it heads back towards the road and will take two miles to do what only takes one mile walking the dirt road. But I would say the views and the solitude are worth the added distance.

View Along Chuck Wagon Trail

Yet More Colored Mountains
Chuck Wagon Trail hits the road where Devil’s Bridge Trail heads up so its pretty straightforward and had no trouble following the path. Once on the trail to the arch, it is very crowded again. It’s about 3/4 mile each way from the dirt road to the arch but it’s all uphill gaining about 300 feet in that distance. There is a great view of some of the surrounding red rock mountains. Partway up the trail was a small area with dozens of rock cairns that almost look like a staging area in case they are required somewhere along the trail.

View Heading Up Devil's Bridge Trail

Rock Cairn Holding Area

Getting Better Views Higher Up Trail
The last few hundred feet of the trail are up some narrow stone steps that definitely became a bottleneck for those wanting to come up or go down. With a little patience, we make it to the arch. It isn’t as large as the ones we saw in Arches National Parks but is still impressive. The arch runs parallel to the trail with about a 40 foot gap. The arch spans nearly 100 feet and is relatively flat across the top with about a 100 foot drop off.   It is possible to walk around the gap and out onto the arch. We had become accustomed to signs warning people to not go onto the arches but no such sign or policy is in place here.

Devil's Bridge

Side View

Close Up of Center Looks Cracked

With all the visitors, there was actual a line of people waiting to walk out onto the arch for somebody else to take their picture. Since the arch is only ten feet or so wide at its narrowest section, I knew Chris wasn’t going to head out and I found myself unwilling to walk out very far. We watched many of the people go out to pose. Most of them would just walk out and smile for the photo but a few people would go out and sit right on the edge of the arch. Even worse, one couple went out to do handstands! It took them a couple attempts to successfully pull it off but they managed to do it. I hope their photo turned out to be as good as mine.

A Somewhat Sane Pose

A Bit More Risky

Would You Believe Jack and Chris Pose???
Since it was later in the afternoon as we headed down, there weren’t quite so many people on the way back down the trail. There was one spot along the trail where it was possible to see the arch from a distance and apparently there is a trail that leads to the bottom of the arch but we didn’t have the energy to seek it out. Once back to the dirt road, we decided to take the shorter route back to the car. The road itself can be driven if you have the correct vehicle but it looked to be a bit of a challenge. We saw a couple ATVs and some Jeep Wranglers in the parking area at the start of the hike to the arch. As we were part way back to the car, there was a stock GMC SUV trying to make it. Without aggressive tires or much ground clearance, I wonder if he actually made it in and out without damage.

View of Devil's Bridge from Trail

Afternoon Sun
Next stop Prescott Arizona.